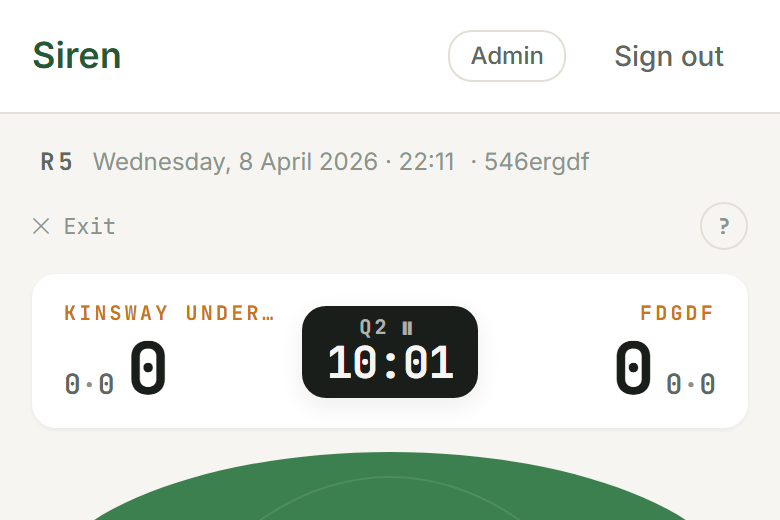
Rotations
The rotation engine watches how much time every player has spent in each position, both in the current game and across the whole season, and suggests swaps that balance things out. You never have to do the maths yourself.
How rotations are applied depends on your sport. Football teams rotate continuously: the app prompts a swap each time the sub timer fires. Netball teams rotate at quarter breaks: the app suggests a fresh lineup at every break, with optional mid-quarter subs if you'd rather not wait. The fairness algorithm is the same — only the moment of action differs.
How the algorithm works
Whenever the app needs to suggest a lineup, it ranks all possible placements by how much they would improve overall fairness, considering:
- Season position minutes: time in each position area across all completed games this year
- Current-game minutes: time accrued so far in this game
- Recent arrival pinning: players who only just came on are not immediately swapped back off (football only — pinned for ~3 minutes during rolling subs)
- Player locks: always-on locked players never leave; position-locked players stay in their assigned position
- Player chips: optional coloured tags that either spread chip-mates across zones (mix older with younger) or keep them together (a kid who needs to stay paired with familiar teammates). See the Squads help page for setup.
The result is a small set of swap pairs (usually one or two at a time during football's rolling subs) or a complete next-quarter lineup (for netball at the break).
The SwapCard (rolling subs)
On football's rolling-sub model, suggested swaps appear in the dark SwapCard above the playing area. It has two states:
- Collapsed: shows a sparkle icon (or countdown ring), the number of suggested swaps, and a one-line summary (e.g. Alex→Sam · Jordan→Blake). Tap to expand.
- Expanded: shows each pair in a row with the position label colour-coded, a Do button per pair, and a Do all N swaps button at the bottom.
After you commit a swap (via Do or Do all), the card collapses automatically and the sub timer resets.
The countdown ring and NOW badge
On rolling subs, the SwapCard header includes a circular progress ring that fills as the sub interval counts down. When it reaches zero:
- The ring turns orange and the counter displays NOW with a pulse animation.
- The card gets an orange ring highlight.
- The card expands automatically to show the suggestions.
Quarter-break rotation (netball)
For netball, the rotation engine runs at the break instead. When a quarter ends, the app shows a Set positions for Q{n} screen with the suggested next lineup already in place. The reshuffle is weighted by who's played least, who hasn't had a turn at their preferred position, and the rules of play (which positions each player can enter). Tap two players to swap them, or accept the suggestion and start the quarter.
Netball teams that prefer to sub mid-quarter can do that too — the app supports both models.
Rotations in rugby league
Junior rugby league has FOUR distinct rotation mechanics that all ride on the same live-game UI. Siren enforces each one so the coach can't accidentally break a law.
Player rotation
Rolling subs, same model as football. Tap a player on the field then tap a bench player to swap them. The fairness engine surfaces a suggestion when the sub interval ticks down.
Vested-role rotation (FR / DH)
Junior Laws §12: the First Receiver wears a yellow vest at U8+; the Dummy Half wears a pink vest at U9+. Both must rotate each period and no player wears the same vest twice in a game. The vest card surfaces at the start of each period and disables players who've already had a turn. An Replace affordance covers the laws' injury carve-out (the vest can pass to a replacement for the rest of that period only).
Goal-kick rotation
Junior Laws §15: once a player has kicked at goal, they can't kick again until everyone on the field at the time has had a turn. After a try, the conversion dialog disables players who've already kicked this cycle and resets the rotation once everyone's had a turn. A boot badge sits on each on-field tile so you can see who's already kicked at a glance, even before opening the dialog. The Force toggle covers the fouled-in-act-of-scoring carve-out.
Kickoff rotation
Junior Laws §16: at the start of each period, every player on the squad must have kicked off at least once before anyone takes a second turn. The kickoff prompt surfaces at the start of each period and disables players who've already had a turn this game. A small "K" chip on the player tile marks anyone who's kicked off so far.
Unbroken-period coverage
Junior Laws §6: every player must play at least two unbroken quarters (U6–U9) or one unbroken half (U10–U12). "Unbroken" means on the field continuously from period kickoff to hooter — no swaps off. The live screen surfaces an at-risk panel with two buckets: players still owed an unbroken period, and players currently on track this period — don't sub off. The post-game stats highlight any shortfalls so you can plan next week's rotations accordingly.
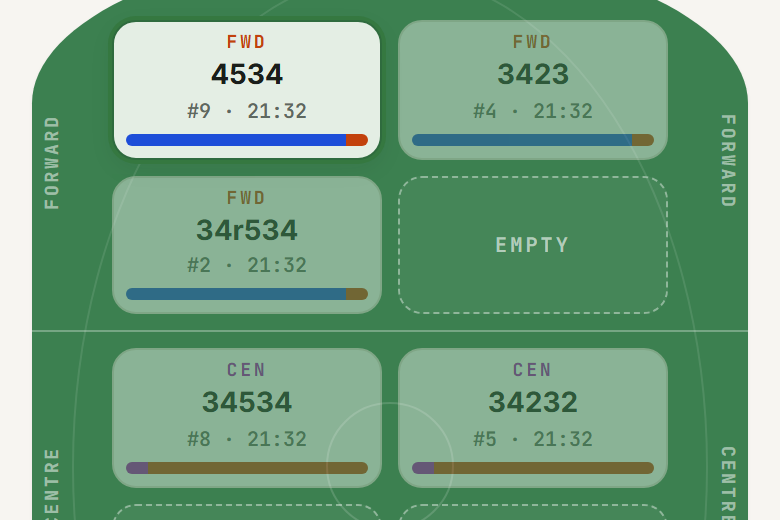
Player tiles and badges
Each player tile shows:
- Jersey number in a small chip (football only — netball squads typically don't use them)
- First name and last initial
- Position label at the top (e.g. FWD / CEN / BCK for football, GS / GA / WA / C / WD / GD / GK for netball)
- A time bar at the bottom: a thin horizontal bar colour-coded by area showing how much time this player has spent where
When a player is part of a pending swap suggestion (rolling subs):
- A ↓ badge marks the player coming off
- A ↑ badge marks the player coming on from the bench
- Both tiles show a pair number so you can match them up
Position colour coding
Colours are consistent across every position indicator in the app. The exact palette differs by sport (each is tuned to the sport's identity), but within a sport the same colour means the same position area everywhere — the live tile, the time bar, the stats cards.

Player locks
Long-press any player to open the Player actions sheet. Lock options are available there:
- Always-on lock: the player is excluded from rotation suggestions and never leaves the playing area for the rest of the game (football's "lock to field").
- Position lock: the player can rotate off temporarily but the algorithm always returns them to the same position. For netball this presents as "Keep at position next break".
The fairness score
The quarter-break screen shows a Fairness score from 0 to 100. It measures how evenly time is spread across the whole squad. 100 is perfectly equal; lower means some kids have had noticeably more or less time in certain positions.
Aim for a high score by the end of the season, not every single game. Individual games often sit lower; that's normal and expected.
The Stats tab shows per-player position breakdowns for the full season.